Hey There! Some links on this page are affiliate links, which means that as an Amazon Associate, I may earn a small commission at no extra cost to you. I greatly appreciate your support! Learn more on my Affiliate Disclosure page.
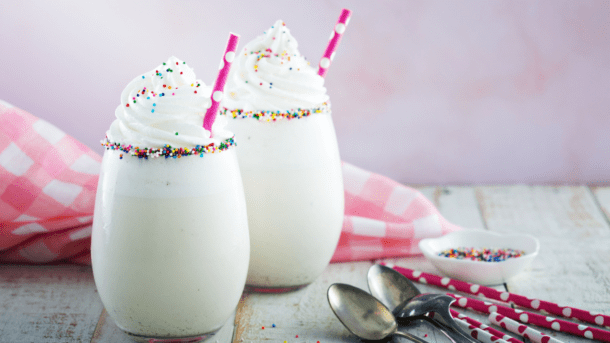
Nothing says classic comfort like a homemade vanilla milkshake. Whether you’re looking for a cool treat on a warm afternoon or a delicious dessert to end your meal, this vanilla milkshake recipe is here to satisfy.
With just a few ingredients and a dash of creativity, you can effortlessly transform simple ingredients into a rich, creamy, refreshing drink perfect for any occasion. The chocolate-dipped, sprinkle-coated glasses bring a fun and festive touch that will make this recipe a hit at parties or family gatherings.
In this article, I’ll guide you through making the perfect vanilla milkshake, including tips for the best presentation, ingredient substitutions, and more. By the end, you’ll be able to whip up this classic dessert like a pro!
Why You Will Love This Recipe

This vanilla milkshake will be a favorite if you like quick and easy recipes. Here’s why:
- Ready in Just 10 Minutes: This milkshake takes less than 10 minutes to prepare from start to finish. It’s perfect for busy days when you want a treat without the fuss.
- Fun and Creative: The chocolate-dipped and sprinkle-coated glass rims add an element of fun, making it not only a delicious drink but also a visually appealing one. It’s great for birthday parties, family celebrations, or a fun afternoon with the kids.
- Highly Customizable: You can easily adjust the consistency to your liking by adding more or less milk, with endless topping possibilities. From whipped cream to crushed cookies, the sky’s the limit!
Ingredients You’ll Need

Let’s break down the ingredients for this delightful milkshake. Each item is crucial in creating the perfect blend of flavors and textures.
| INGREDIENT | DESCRIPTION |
|---|---|
| Rainbow sprinkles | Adds a colorful, crunchy coating to the glass rims. Great for a festive touch. |
| Mini chocolate chips | These melt quickly to coat the glass rims. Substitute regular chips if needed. |
| Vanilla ice cream | Use a high-quality brand for the creamiest texture. Classic vanilla works best. |
| Real vanilla extract | Enhances the vanilla flavor of the ice cream. Pure vanilla gives the best results. |
| Whole milk | It adds creaminess and helps achieve the perfect milkshake consistency. Adjust as needed. |
| FOR GARNISH: | Optional, but highly recommended for a fun presentation. |
| Whipped cream | Adds a light, airy topping that’s perfect for milkshakes. |
| Rainbow sprinkles | For a final touch of color and texture on top of the whipped cream. |
| Maraschino cherries | The classic milkshake garnish. Bright, sweet, and eye-catching. |
Optional ingredient:
- Corn syrup: If you prefer not to melt chocolate chips, you can use corn syrup to adhere the sprinkles to the glass rims.
Kitchen Tools You’ll Need

To make this milkshake at home, you don’t need much. Here’s a quick rundown of the tools required:
| TOOL | DESCRIPTION |
|---|---|
| Blender | Essential for blending the ice cream, milk, and vanilla extract to a smooth consistency. |
| Ramekin | It helps melt the chocolate chips into an even layer. Reduces the amount of chocolate needed. |
| Microwave | Quick and easy way to melt the chocolate chips. |
| Shallow plate and bowl | Used for dipping and rolling the glass rims in chocolate and sprinkles. |
| Serving glasses | Choose wide-rimmed glasses to show off the sprinkle-coated edges. |

Homemade Vanilla Milkshake: Step-By-Step Recipe
Ingredients
Milkshake Ingredients:
- ⅓ c. Rainbow sprinkles
- ¼ c. Mini chocolate chips – You can use full-size chocolate chips, but it will take a little longer to melt. Use additional chocolate chips if not using a ramekin
- 3 c. Ice cream – Vanilla
- 1 t. Real vanilla extract
- ⅓ c. Whole milk – Plus extra to achieve the desired consistency, if desired
For Garnish:
- Whipped cream
- Rainbow sprinkles
- Maraschino cherries
Instructions
- Pour rainbow sprinkles onto a shallow plate.

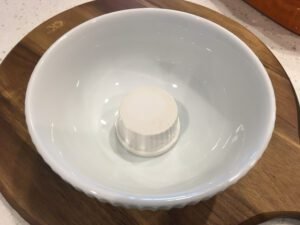
- Place a small ramekin, topside down, inside a small bowl wide enough to fit the top of each serving glass.
- Pour the mini-chocolate chips around the ramekin. (If unavailable, add one-half cup of chocolate chips directly to the bowl).
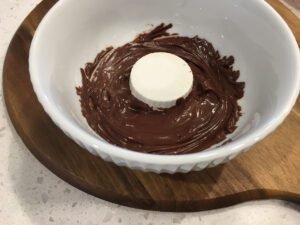
- Microwave on 50% power until the chips melt, approximately 2-3 minutes. Check after 90 seconds to determine the total microwave time.
- Remove the bowl from the microwave and carefully break up any remaining solid pieces of chocolate with a fork.
- Next, dip the tops of each glass into the melted chocolate.
- Roll the chocolate-coated edge in the rainbow sprinkles until uniformly coated. Turn the glasses upright and set them aside to dry.
- To a blender, add ice cream.
- Add vanilla extract.
- Add milk and blend until smooth. If desired, add a little additional milk to reach the desired consistency.
- To serve, pour the milkshake into the prepared glasses.
- Top with whipped cream, additional sprinkles, a maraschino cherry, and enjoy!


Video
RECIPE DIRECTIONS
Prepare the Sprinkle Rim:
Pour the rainbow sprinkles onto a shallow plate. Place a small ramekin upside down in a wide bowl large enough to fit the top of your serving glasses. This technique helps you control how much chocolate you use.Melt the Chocolate Chips:
Add the mini chocolate chips around the ramekin in the bowl and microwave at 50% power for 2-3 minutes. Stop halfway through to check and stir, ensuring the chocolate melts evenly. If using full-size chips, increase the microwave time slightly.Coat the Glass Rims:
Once the chocolate is melted, use a fork to break up any remaining solid pieces. Dip the rims of the glasses into the melted chocolate, then roll them in the rainbow sprinkles, making sure the entire rim is evenly coated. Set the glasses aside to let the chocolate harden.Blend the Milkshake:
Add 3 cups of vanilla ice cream, 1 teaspoon of real vanilla extract, and 1/3 cup of whole milk to a blender. Blend until smooth and creamy. If the milkshake is too thick, add a little extra milk to achieve your desired consistency.Serve:
Pour the blended milkshake into the prepared glasses. Top with whipped cream, more rainbow sprinkles, and a maraschino cherry for the classic milkshake look. Serve immediately and enjoy!Recipe Tips and Tricks

Here are a few tips to help you get the best results:
| TIP | DESCRIPTION |
|---|---|
| Melting Chocolate | If you don’t have a microwave, melt chocolate chips using a double boiler on the stovetop. Stir constantly to avoid burning. |
| Adjusting Consistency | Reduce the amount of milk for a thicker milkshake. Add more milk gradually until the desired consistency is reached for a thinner shake. |
| Substitutions | If you don’t have mini chocolate chips, use full-size ones. Increase microwave time slightly and stir often to prevent burning. |
| Add-Ins | For extra flavor, customize your milkshake with mix-ins like crushed cookies, chocolate syrup, caramel drizzle, peanut butter, or fresh fruit. |
| Making it Dairy-Free | For a vegan-friendly version, substitute dairy ice cream and milk with plant-based alternatives like almond milk and coconut ice cream. |
| Quick Garnish Option | If you’re in a hurry, skip melting chocolate and coat the rim of the glass with corn syrup before adding sprinkles. |
| Boosting Flavor | For a flavor boost, add a splash of coffee or flavored syrup (like hazelnut or caramel) to the milkshake mixture before blending. |
| Freezing Milkshake | If you want to save a milkshake for later, freeze it for up to 30 minutes, but remember it will lose some creaminess over time. |
Serving Suggestions and Presentation Tips

While this milkshake is a treat on its own, here are a few ideas to elevate your presentation:
| SERVING IDEA | DESCRIPTION |
|---|---|
| Serve with Sides | Pair your milkshake with freshly baked cookies, a slice of cake, or brownies for a more indulgent dessert experience. |
| Creative Toppings | For a unique twist, top with whipped cream, caramel sauce, mini marshmallows, crushed Oreos, or even sprinkles of edible glitter. |
| Straws and Glassware | Serve the milkshake in vintage milkshake glasses with colorful paper straws for a retro, diner-style look. |
| Drizzle the Glass | Before pouring in the milkshake, drizzle the inside of the glass with chocolate or caramel sauce for extra visual appeal. |
| Theme Variations | You can change the sprinkle colors to fit the occasion—red and green for Christmas, orange and black for Halloween, or pastel shades for Easter. |
| Milkshake Bar | For parties, set up a milkshake bar where guests can add their own toppings, such as sprinkles, chocolate chips, or fruit. |
| Fun Garnish Ideas | For an extra fun touch, garnish with fun additions like a candy cane for the holidays or a skewer with fruit, mini donuts, or brownies. |
| Chilled Glasses | Chill your serving glasses in the freezer for 10 minutes before serving the milkshake to keep it cool longer. |
Conclusion

This homemade vanilla milkshake is a simple yet delightful treat that never goes out of style. Whether you’re whipping one up for yourself or making a batch for friends and family, it’s bound to bring smiles all around. The combination of rich vanilla flavor, creamy texture, and fun presentation makes this recipe one you’ll come back to again and again.
Ready to make your own vanilla milkshake? Don’t forget to share your results in the comments below. We’d love to see how you customized it with your favorite toppings or presentation ideas! Tag us on social media with #VanillaShakeDelight, and follow us for more tasty recipes.
Thank you for reading! If you enjoyed this recipe, follow us on social media and subscribe to our blog for more delicious recipes and cooking tips.
Happy cooking!
FAQs

Can I make this milkshake ahead of time?
While the milkshake is best enjoyed fresh, you can prepare the sprinkle-rimmed glasses in advance. To keep its creamy texture, it’s ideal to make the shake just before serving.
Can I use other flavors of ice cream?
Yes, you can substitute vanilla ice cream with any flavor you like, such as chocolate or strawberry. The process remains the same, and it’s a great way to experiment with different combinations.
How do I store leftover milkshakes?
Milkshakes are best served immediately, but they can be stored in the freezer for up to 24 hours. However, they may lose some creaminess when stored.
Can I use almond milk instead of whole milk?
Yes, almond milk or other plant-based alternatives can be used if you’re looking for a dairy-free option. However, they may slightly affect the creaminess compared to whole milk.
Is this recipe suitable for kids to help with?
Absolutely! Kids will love helping with the sprinkle-rimmed glasses and adding toppings, making it a fun and interactive recipe.
What if I don’t have a blender?
You can mix the ingredients by hand with a whisk and a mixing bowl, though the consistency may not be as smooth. A blender is recommended for the best results.
Can I make this milkshake dairy-free?
Yes! Simply substitute the ice cream and milk with vegan options like coconut milk and dairy-free ice cream for a delicious dairy-free treat.
How can I make this shake thicker?
To make a thicker milkshake, use less milk or add an extra scoop of ice cream. You can always adjust the consistency as you blend.
Can I melt the chocolate without a microwave?
Yes, you can use a double boiler on the stovetop to gently melt the chocolate. Just be sure to stir constantly to prevent burning.
Hey There! Some links on this page are affiliate links, which means that as an Amazon Associate, I may earn a small commission at no extra cost to you. I greatly appreciate your support! Learn more on my Affiliate Disclosure page.