Hey There! Some links on this page are affiliate links, which means that as an Amazon Associate, I may earn a small commission at no extra cost to you. I greatly appreciate your support! Learn more on my Affiliate Disclosure page.
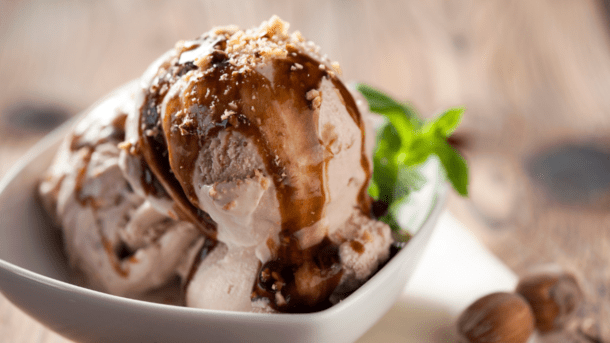
Have you ever wanted to make homemade ice cream but felt discouraged because you don’t own an ice cream maker? Now you can enjoy creamy, luscious ice cream with a decadent twist—no special equipment is needed. This No-Churn Chocolate Toffee Ice Cream recipe is an easy, approachable way to create a delightful dessert that’s sure to impress.
Whether you’re an experienced cook or a beginner just venturing into the world of homemade treats, this recipe makes it simple to achieve professional-quality results in your kitchen.
Why You Will Love This Recipe

There are many reasons to fall in love with this no-churn ice cream. From the rich, velvety texture to the irresistible combination of toffee and chocolate, here’s why this recipe stands out:
- No special equipment required: You don’t need an ice cream maker or any fancy gadgets—just a few basic tools.
- Creamy and rich: The whipped heavy cream and sweetened condensed milk create a perfectly creamy base.
- Chocolate-toffee magic: The homemade chocolate syrup adds depth of flavor, while the Heath English Toffee Bits offer a delicious crunch in every bite.
- Customizable: Feel free to substitute the toffee with your favorite mix-ins, such as chocolate chips, caramel, or nuts, for your own personalized twist.
Let’s dive into how you can make this at home!
Ingredients You’ll Need

Creating this no-churn ice cream requires just a handful of ingredients, all contributing to the luxurious texture and flavor. Here’s what you’ll need:
Toffee Ice Cream Ingredients:
| INGREDIENT | DESCRIPTION |
|---|---|
| Heavy cream | It whips into a fluffy texture, giving the ice cream its rich and creamy consistency. |
| Sweetened condensed milk | It adds sweetness and helps create a smooth, dense ice cream texture. |
| Vanilla extract | It enhances the overall flavor of the ice cream, adding a warm sweetness. |
| Chocolate syrup | Recipe below. Adds a rich chocolate flavor throughout the layers. |
| Heath English Toffee Bits | For crunch and sweetness. You can substitute with crushed English toffee pieces. |
Chocolate Syrup Ingredients:
| INGREDIENT | DESCRIPTION |
|---|---|
| Water | It provides the base for dissolving the sugar and cocoa powder. |
| White sugar | Sweetens the chocolate syrup and balances the bitterness of cocoa. |
| Unsweetened dark cocoa powder | Adds rich, deep chocolate flavor to the syrup. |
| Vanilla extract | Enhances the overall flavor with a warm, sweet note. |
| Salt | It balances the sweetness and enhances the chocolate flavor. |
Tip: For the best results, use high-quality cocoa powder to give the syrup a rich flavor.
Kitchen Tools You’ll Need

You’ll only need a few basic tools to whip up this no-churn ice cream, most of which are likely already in your kitchen. Here’s what you’ll need and why:
| TOOL | PURPOSE |
|---|---|
| Mixing Bowl | Used for whipping the heavy cream and combining the ingredients. |
| Hand Mixer | It makes whipping the cream effortless and quick. |
| Spatula | It helps to gently fold ingredients together without deflating the whipped cream. |
| 9”x5” Loaf Pan | The perfect size for layering the ice cream mixture. |
| Plastic Wrap | Covers the pan while freezing to prevent ice crystals from forming. |
| Butter Knife | Used to swirl the chocolate syrup and toffee bits into the ice cream for a marble effect. |
| Ice Cream Scoop | For serving the perfect scoop. |

No-Churn Chocolate Toffee Ice Cream: Step-By-Step Recipe
Ingredients
ChocolateSyrup Ingredients:
- ½ c. Water
- ½ c. White sugar
- ⅓ c. Dark cocoa powder – unsweetened
- 1 t. Real vanilla extract
- ⅛ t. Salt
No-Churn Toffee Chocolate Ice Cream Ingredients:
- 2 c. Heavy cream
- 1¼ oz. Sweetened condensed milk – can
- 1 t. Real vanilla extract
- ⅓ c. Chocolate syrup – chilled, divided (ingredients above)
- ⅔ c. Heath English Toffee Bits – Can be ordered online or substituted with crushed English toffee.
- Garnish – Additional Heath Toffee Bits and chocolate syrup
Instructions
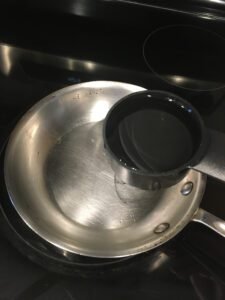
Chocolate Syrup Instructions:
- To prepare the chocolate syrup, in a small skillet set over medium heat, add water.

- Add sugar.
- Add cocoa powder.
- Add vanilla extract.
- And salt.
- Whisk vigorously until the sugar is dissolved and the cocoa powder is thoroughly incorporated into the mixture, approximately 2-3 minutes.


Toffee Chocolate Ice Cream Instructions:
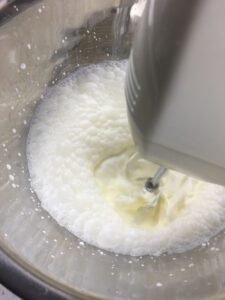
- Pour heavy whipping cream into a large mixing bowl.
- Using an electric hand mixer, set on high beat until the whipping cream is light and fluffy.
- While mixing, use a spatula to scrape the sides of the bowl to ensure all the heavy cream is whipped. Then, set the bowl aside.
- Pour sweetened condensed milk into a large mixing bowl.
- Add vanilla extract.
- Stir to combine.
- Lighten the condensed milk by gently folding a small amount of the whipped cream into the bowl.
- Make sure not to overmix.
- Add the rest of the whipped cream and fold into the mixture until thoroughly combined.
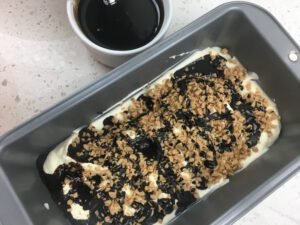
- Pour half the whipped cream mixture into a 9"x5" loaf pan.
- Using a spatula, spread the mixture into an even layer.
- Spread 1/3 cup of the toffee bits evenly across the top.
- Drizzle half the chocolate syrup over the toffee bits.
- Spoon the remaining whipped cream mixture on top and spread using a spatula until smooth.
- Repeat the process described in the previous step with the remaining chocolate syrup and toffee.
- Insert a butter knife into the mixture at one end of the loaf pan and pull it back and forth across the length of the pan to incorporate the chocolate and toffee throughout.
- Cover with some plastic wrap and gently press across the top to remove any air bubbles.
- Place in the freezer for a minimum of four hours, or preferably overnight.
- Remove from the freezer 10-15 minutes before serving to soften.
- To serve, scoop into individual bowls.
- Top with additional chocolate sauce and toffee bits if desired, and enjoy!


Video
RECIPE DIRECTIONS
Step 1: Make the Chocolate Syrup
- Combine ingredients: In a small saucepan, mix water, sugar, cocoa powder, vanilla extract, and salt.
- Whisk: Over medium heat, whisk vigorously until the sugar dissolves and the cocoa powder is fully incorporated—about 2-3 minutes.
- Cool: Remove from heat and let the syrup cool completely before using. You can store it in an airtight container in the refrigerator.
Step 2: Whip the Heavy Cream
- Whip the cream: Pour 2 cups of heavy cream into a large mixing bowl. Use a hand mixer to beat the cream on high until it becomes light and fluffy, with stiff peaks.
- Check the consistency: You’ll know the cream is ready when you can lift the beaters out of the bowl and the whipped cream holds its shape.
- Tip: Chill your mixing bowl and beaters before whipping the cream for best results. This helps it whip up faster and stay fluffy longer.
Step 3: Prepare the Ice Cream Base
- Combine sweetened condensed milk and vanilla: In another large bowl, stir the sweetened milk and vanilla extract together.
- Lighten the mixture: Gently fold in a small amount of the whipped cream to lighten the mix. Be careful not to overmix—you want to maintain the airiness of the whipped cream.
- Incorporate the rest of the whipped cream: Add the remaining whipped cream and fold until just combined.
Step 4: Layer the Ice Cream
- First layer: Pour half of the whipped cream mixture into your loaf pan and spread it into an even layer.
- Drizzle and sprinkle: Drizzle half of the chocolate syrup over the whipped cream and sprinkle 1/3 cup of Heath Toffee Bits evenly across the top.
- Second layer: Spoon the remaining whipped cream mixture on top, spread until smooth, and repeat the drizzle and sprinkle process with the remaining syrup and toffee bits.
Step 5: Swirl and Freeze
- Swirl the mixture: Insert a butter knife into the ice cream and swirl it gently back and forth to create a marbled effect with the chocolate and toffee.
- Cover and freeze: Cover the loaf pan with plastic wrap, pressing it gently against the surface of the ice cream to remove air bubbles. Freeze for at least 4 hours, but preferably overnight.
Step 6: Serve
- Let it soften: Remove the ice cream from the freezer 10-15 minutes before serving to allow it to soften slightly.
- Scoop and enjoy: Use an ice cream scoop to serve in bowls or cones. If desired, garnish with extra chocolate syrup and toffee bits.
Recipe Tips and Tricks

Creating this no-churn ice cream is easy, but a few extra tips and tricks can elevate the flavor and texture even more. From smart ingredient swaps to creative add-ins, these suggestions will help you make the recipe your own.
| CATEGORY | DETAILS |
|---|---|
| Substitutions | Can’t find Heath Toffee Bits? Try crushed English toffee, chopped chocolate-covered toffee bars, or caramel-filled chocolates for added indulgence. |
| Storage | Leftover ice cream can be stored in an airtight container in the freezer for up to two weeks. To prevent ice crystals, press plastic wrap onto the ice cream’s surface before sealing. |
| Customization | Add chocolate chips for extra texture, crushed cookies for a crunchy bite, or swirls of caramel sauce for extra sweetness and richness. |
| Texture Tip | For a more swirled effect with chocolate syrup and toffee bits, gently fold them into the mixture instead of layering to evenly distribute. |
Serving Suggestions and Presentation Tips

Take your homemade ice cream to the next level by serving it with a touch of flair. Whether you drizzle on more chocolate or pair it with a warm brownie, these ideas will ensure your dessert looks and tastes as good as it deserves.
| IDEA | DESCRIPTION |
|---|---|
| Drizzle with Chocolate Syrup | Before serving, add an extra drizzle of chocolate syrup to the ice cream for an indulgent, visually appealing touch. |
| Serve in Waffle Cones | Scoop the ice cream into waffle cones for a nostalgic ice cream shop feel. The crunchy cones perfectly complement the creamy texture. |
| Pair with a Warm Brownie | Serve a scoop of the ice cream on top of a warm brownie for a rich, show-stopping dessert with a contrast between hot and cold. |
| Add Fresh Berries | Garnish with fresh berries, such as raspberries or strawberries, for a pop of color, freshness, and a balance of tartness against sweetness. |
Conclusion

This No-Churn Toffee Chocolate Ice Cream is everything you want in a homemade dessert—rich, creamy, and filled with layers of flavor. Best of all, it’s incredibly easy to make and requires no fancy equipment.
Whether serving it at a family gathering or treating yourself to a sweet indulgence, this ice cream will surely be a hit. So, why wait? Whip up a batch today and experience the deliciousness for yourself!
Now that you’ve seen how easy it is to make No-Churn Toffee Chocolate Ice Cream, try it in your kitchen and customize it with your favorite mix-ins! Share your results in the comments or tag #CookWithCem on social media. Don’t forget to follow us on social media for more easy dessert recipes!
Happy cooking!
FAQs

Can I use regular milk instead of heavy cream?
Unfortunately, no. Heavy cream is essential for creating no-churn ice cream’s thick and creamy texture. Regular milk won’t whip or provide the same richness.
Can I make this recipe without toffee bits?
Absolutely! You can easily swap the toffee bits for other mix-ins like chocolate chips, caramel swirls, or nuts, or leave them out altogether if you prefer a simpler flavor.
What if I don’t have a hand mixer?
You can still make this recipe by whipping the cream by hand, although it may take a bit more time and effort. Use a large whisk and make sure your cream is well-chilled to speed up the process.
How long does this ice cream take to freeze?
For the best texture, freeze the ice cream for at least 4 hours, but overnight freezing is ideal to ensure it sets properly.
Can I use store-bought chocolate syrup instead of making my own?
Yes, you can substitute store-bought chocolate syrup if you’re short on time. However, homemade syrup offers a richer, more authentic flavor that perfectly complements the ice cream.
How long can I store this ice cream in the freezer?
This no-churn ice cream will last up to 2 weeks in an airtight container. Cover it with plastic wrap to prevent ice crystals from forming on top.
Can I double this recipe?
Definitely! If you’re serving a crowd or want to make extra for later, simply double the ingredients and freeze them in a larger container.
Is this recipe gluten-free?
Yes, the base ice cream recipe is gluten-free. However, check the packaging of the toffee bits or any mix-ins you add to ensure they’re also gluten-free.
What’s the best way to soften the ice cream before serving?
Remove the ice cream from the freezer and let it sit at room temperature for 10-15 minutes before scooping. This will make it easier to serve and enhance the flavor.
Hey There! Some links on this page are affiliate links, which means that as an Amazon Associate, I may earn a small commission at no extra cost to you. I greatly appreciate your support! Learn more on my Affiliate Disclosure page.