Hey There! Some links on this page are affiliate links, which means that as an Amazon Associate, I may earn a small commission at no extra cost to you. I greatly appreciate your support! Learn more on my Affiliate Disclosure page.
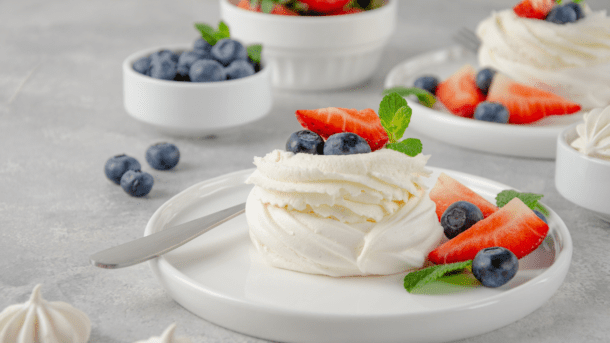
Are you ready to embark on a culinary journey that will tantalize your taste buds and impress your guests? Look no further than these delectable Mini-Pavlovas with Fresh Berries.
This Australian-inspired dessert, named after the famous ballerina Anna Pavlova, perfectly blends a crispy meringue exterior with a soft, marshmallow-like interior. Today, we’ll guide you through creating these elegant treats, which are sure to become a staple in your dessert repertoire.
Why You’ll Fall in Love with This Recipe

Prepare to be enchanted by these Mini-Pavlovas! Here’s why you’ll adore making (and eating) them:
- The perfect balance of textures will delight your palate – a crispy shell gives way to a cloud-like interior, creating a heavenly mouthfeel.
- Versatile topping options allow you to personalize each pavlova to your heart’s content. From fresh berries to chocolate chips, the possibilities are endless!
- These pavlovas are make-ahead friendly, making them perfect for stress-free entertaining. Prepare the bases in advance and add toppings just before serving.
- Looking for a gluten-free dessert option? These mini Pavlovas have you covered, making them ideal for guests with diverse dietary needs.
- Despite their elegant appearance, these pavlovas offer an impressive presentation with minimal effort. With just a few simple steps, you’ll look like a pastry chef!
Ingredients for Mini-Pavlova Perfection

Let’s dive into the heart of our recipe – the ingredients. Each component plays a crucial role in creating the perfect Mini-Pavlova. Here’s what you’ll need:
| INGREDIENT | TIPS FOR BEST RESULTS |
|---|---|
| Large egg whites | Ensure the egg whites are at room temperature before beating. |
| White sugar | Use superfine sugar for better incorporation and smoother meringue. |
| Cream of tartar | It helps to stabilize the egg whites for a firmer texture. |
| Corn starch | Gives the meringue its chewy, marshmallow-like center. |
| Whipped cream | You can use homemade or store-bought or try coconut cream for a dairy-free option. |
| Fresh blackberries, raspberries, and/or strawberries | Choose ripe, fresh berries for the best flavor. |
| Mini-chocolate chips (optional) | Add a sprinkle for an extra layer of indulgence. |
| Fresh mint and/or basil | Adds a pop of color and freshness to your presentation. |
Essential Kitchen Tools

To create your mini Pavlovas, you’ll need some key kitchen tools. Don’t worry if you don’t have everything—we’ve included some alternatives, too!
| TOOL | DESCRIPTION |
|---|---|
| Stand mixer or hand mixer | For whipping egg whites to perfection |
| Large, rimmed baking sheets | To bake your pavlovas |
| Parchment paper or Silpat™ mats | It prevents sticking and ensures easy removal |
| Mixing bowls | For preparing your ingredients |
| Measuring cups and spoons | For accurate ingredient measurements |
| Spatula or large spoon | For shaping your pavlovas |
| Cooling rack | For cooling your baked pavlovas |

Step-by-Step Recipe: Guide to Meringue Mastery
Ingredients
Ingredients:
- 4 ea. Large eggs – room temperature
- 1 c. Sugar – white
- ½ t. Cream of tartare
- ¾ t. Corn starch
Topings:
- Whipped cream
- Fresh blackberries, raspberries, and/or strawberries
- Mini-chocolate chips – optional
- Fresh mint and/or basil to garnish
Instructions
- Arrange oven racks toward the center of the oven, equal distance apart.

- Pre-heat the oven to 300°F.
- Line two large, rimmed baking sheets with parchment paper or Silpat™ baking sheets and set them aside.
- Add egg whites to a mixing bowl.
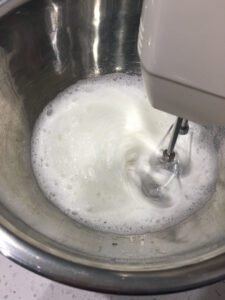
- Using a stand or hand mixer, beat the egg whites until they thicken and turn white.
- While mixing, slowly add the sugar, one or two tablespoons at a time, until each addition in thoroughly incorporated into the egg whites.
- Add the cream of tartar and cornstarch and continue beating until the mixture is stiff and glossy.
- Spoon the mixture onto the prepared baking sheets in equal sized portions.
- Use the back of the spoon to create an indent to place toppings after baking.
- Place the baking sheets into the pre-heated oven for 10 minutes, then reduce heat to 225°F.
- Continue baking for 45 minutes, then turn off the oven.
- Allow pavlovas to rest in the oven for one hour without opening the door.
- After one hour, remove the baking sheets from the oven.
- Top the mini pavlovas with whipped cream.
- To garnish, top the Pavlovas with fresh berries, mini-chocolate chips, and/or fresh herbs.
- Serve immediately after topping, and enjoy!


Video
RECIPE DIRECTIONS
Prepare Your Workspace:
- Preheat your oven to 300°F (150°C). This initial high temperature helps set the exterior of your pavlovas.
- Line your baking sheets with parchment paper or Silpat™ mats. This prevents sticking and makes removal a breeze.
Whip the Egg Whites:
- Start beating the egg whites on medium speed in your stand mixer or large bowl. You’ll see them start to thicken and turn white.
- Gradually add the sugar, about a tablespoon at a time, while continuing to beat. This slow addition ensures your meringue is stable and glossy.
- Once all the sugar is incorporated, add the cream of tartar and cornstarch. These ingredients help stabilize your meringue and create that perfect texture.
- Continue beating until your meringue is stiff and glossy. You should be able to hold the bowl upside down without the meringue budging!
Shape Your Pavlovas:
- Using your spatula or large spoon, dollop the meringue mixture onto your prepared baking sheets. Aim for about 15 equal-sized portions.
- Create a slight indentation in the center of each pavlova. This will hold your delicious toppings later!
Baking Your Mini-Pavlovas:
- Place your baking sheets in the preheated oven and bake for 10 minutes at 300°F.
- After 10 minutes, reduce the heat to 225°F (107°C) and continue baking for 45 minutes.
- Once the baking time is up, turn off the oven, but do not open the door. Let your pavlovas rest in the cooling oven for 1 hour. This slow cooling prevents cracking and ensures a perfect texture.
Add the Finishing Touches:
- Once your pavlovas have cooled completely, it’s time for the fun part – decorating!
- Top each pavlova with a dollop of whipped cream and arrange your fresh berries on top.
- For an extra touch of indulgence, sprinkle some mini chocolate chips over your berries.
- Finally, garnish with a fresh mint or basil leaf for a pop of color and freshness.
Pro Tips for Pavlova Perfection

Want to take your Mini-Pavlovas from great to extraordinary? Here are some professional tips to elevate your meringue game:
- Separate your eggs when cold, but let the whites come to room temperature before beating. Cold eggs separate more easily, but room-temperature whites whip up better.
- Add your sugar slowly – this is key for a stable meringue. Patience here pays off in texture!
- When shaping your pavlovas, create a slight “well” in the center of each one. This will naturally hold your toppings and prevent them from sliding off.
- If you’re not serving immediately, you can store unfilled pavlovas in an airtight container for up to 2 days. Just add your toppings right before serving to maintain that perfect crispy exterior.
Serving Suggestions and Presentation Ideas

Now that you’ve mastered the art of Mini-Pavlovas, let’s talk about how to serve them in style:
| SERVING TIP | DESCRIPTION |
|---|---|
| Create a Pavlova Bar | Set up a variety of toppings, such as whipped cream, fresh berries, chocolate chips, and nuts. Let guests customize their mini desserts for a fun and interactive experience. |
| Pair with Dessert Wine or Champagne | For an elegant pairing, complement the light and airy pavlovas with a fruity dessert wine or a glass of champagne. |
| Use a Tiered Cake Stand | Display your mini pavlovas on a beautiful tiered cake stand to create a stunning centerpiece. This simple touch adds a touch of elegance to any gathering. |
| Add an Indulgent Drizzle | Drizzling your pavlovas with homemade berry coulis or melted chocolate right before serving enhances the flavors and adds an extra layer of indulgence. |
Your Gateway to Meringue Mastery

Congratulations! You’ve now mastered the art of creating Mini-Pavlovas with Fresh Berries. This dessert is not just a treat for the taste buds but also a feast for the eyes.
The delicate balance of textures – from the crispy exterior to the marshmallow-like interior, topped with fresh cream and berries – creates a symphony of flavors that will impress.
Remember, the key to perfect pavlovas lies in the details. Take your time with each step, from whipping the egg whites to the slow cooling process. With practice, you’ll find yourself creating these elegant desserts with ease.
Your Turn to Create!

Now it’s your turn to put your new skills to the test! We’d love to see your Mini-Pavlova creations. Share your photos and experiences in the comments below.
Did you try a unique topping combination? Did you discover a new presentation style? Your insights could inspire fellow bakers in our community.
Don’t forget to subscribe to our newsletter for more delightful recipes and cooking tips. Whether you’re a seasoned baker or just starting your culinary journey, there’s always something new to learn and create in the kitchen.
Happy baking!
FAQs: Your Pavlova Questions Answered

Can I make pavlovas ahead of time?
You can prepare the meringue bases up to 2 days in advance. Store them in an airtight container at room temperature and add toppings just before serving.
Why did my pavlova crack?
Rapid temperature changes can cause cracking. To prevent this, allow your pavlovas to cool slowly in the oven with the door closed.
Can I use frozen berries instead of fresh ones?
Fresh berries are preferred for texture, but you can use thawed frozen berries. Pat them dry to prevent excess moisture from softening the meringue.
Is it possible to make a large pavlova instead of minis?
Absolutely! Adjust the baking time to 1 hour at 250°F (120°C) for a single large pavlova.
How do I know when my pavlova is done?
A perfectly baked pavlova should be dry and crisp on the outside, with a slight give when touched. It should lift easily from the parchment paper.
Can I use a sugar substitute in this recipe?
Traditional pavlovas require sugar for structure. While some artificial sweeteners might work, they can affect texture and stability.
What causes my pavlova to be chewy or sticky?
Excess moisture or humidity can make pavlovas chewy. Ensure your oven is completely cool before removing them, and store them in a dry place.
How long can I keep leftover pavlova?
Unfilled pavlovas can last 2-3 days in an airtight container. Once topped, they’re best consumed immediately to prevent sogginess.
Can I make pavlova without cream of tartar?
Yes, you can substitute cream of tartar with an equal amount of white vinegar or lemon juice to stabilize the egg whites.
Hey There! Some links on this page are affiliate links, which means that as an Amazon Associate, I may earn a small commission at no extra cost to you. I greatly appreciate your support! Learn more on my Affiliate Disclosure page.